0%

LLDB调试技巧(整理)

LLDB的基础使用

help < command >

最简单命令是help,它会列举出所有的命令。
例如:

help print 或者 help thread。

print

缩写:prin or pri or p

例如:

(lldb) print count
(NSUInteger) $0 = 99
(lldb) print $0 + 7
(unsigned long) $1 = 106

说明:(其实 print 是 expression -- 的缩写)

打印变量

  • 默认是10进制

  • 十六进制

    (lldb) p/x 16
    0x10
  • 二进制

    (lldb) p/t 16
    0b00000000000000000000000000010000
    (lldb) p/t (char)16
    0b00010000

    你也可以使用 p/c 打印字符,或者 p/s 打印以空终止的字符串 (注:以 '\0' 结尾的字符串)。
    这里是格式的完整清单。

expression

缩写:e

例如:

(lldb) expression count = 42
(NSUInteger) $4 = 42
(lldb) print count
(NSUInteger) $5 = 42

打印对象

参数 e -O --(查看对象description 方法的结果)

(lldb) p @[ @"foo", @"bar" ]
(NSArray *) $8 = 0x00007fdb9b71b3e0 @"2 objects"
(lldb) e -O -- $8
<__NSArrayI 0x7fdb9b71b3e0>(
foo,
bar
)

参数 e -O --,缩写是:**po**

(lldb) po $8
<__NSArrayI 0x7fdb9b71b3e0>(
foo,
bar
)
(lldb) po @"lunar"
lunar
(lldb) p @"lunar"
(NSString *) $13 = 0x00007fdb9d0003b0 @"lunar"

定义变量

(lldb) e int $a = 2
(lldb) p $a * 19
38
(lldb) e NSArray *$array = @[ @"Saturday", @"Sunday", @"Monday" ]
(lldb) p [$array count]
2
(lldb) po [[$array objectAtIndex:0] uppercaseString]
SATURDAY
(lldb) p [[$array objectAtIndex:$a] characterAtIndex:0]
error: no known method '-characterAtIndex:'; cast the message send to the method's return type
error: 1 errors parsing expression

但是LLDB无法确定涉及的类型,需要指定类型:

(lldb) p (char)[[$array objectAtIndex:$a] characterAtIndex:0]
'M'
(lldb) p/d (char)[[$array objectAtIndex:$a] characterAtIndex:0]
77

流程控制

Xcode上的流程控制按钮对应LLDB命令:
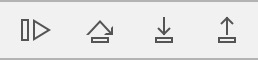
从左到右,四个按钮分别是:
continue
step over
step into
step out

  • process continue命令对应 :continue按钮
    (别名continue,或直接缩写为c

  • thread step-over命令对应:step over按钮
    (缩写:nextn

  • thread step in命令对应:step into
    (缩写:steps

Thread Return命令

它有一个可选参数,在执行时它会把可选参数加载进返回寄存器里,然后立刻执行返回命令,跳出当前栈帧。这意味这函数剩余的部分不会被执行。这会给 ARC 的引用计数造成一些问题,或者会使函数内的清理部分失效。但是在函数的开头执行这个命令,是个非常好的隔离这个函数,伪造返回值的方式 。

(lldb) p i
(int) $0 = 99
(lldb) s
(lldb) thread return NO
(lldb) n
(lldb) p even0
(BOOL) $2 = NO
(lldb) frame info
frame #0: 0x00000001009a5cc4 DebuggerDance`main + 52 at main.m:17

LLDB中的断点

breakpoint list (或者 br li) 命令

管理断点

Xcode里你可以点击单个断点来开启或关闭:
LLDB 中使用 breakpoint enable <breakpointID> breakpoint disable <breakpointID>

(lldb) br li
Current breakpoints:
1: file = '/Users/arig/Desktop/DebuggerDance/DebuggerDance/main.m', line = 16, locations = 1, resolved = 1, hit count = 1

1.1: where = DebuggerDance`main + 27 at main.m:16, address = 0x000000010a3f6cab, resolved, hit count = 1

(lldb) br dis 1
1 breakpoints disabled.
(lldb) br li
Current breakpoints:
1: file = '/Users/arig/Desktop/DebuggerDance/DebuggerDance/main.m', line = 16, locations = 1 Options: disabled

1.1: where = DebuggerDance`main + 27 at main.m:16, address = 0x000000010a3f6cab, unresolved, hit count = 1

(lldb) br del 1
1 breakpoints deleted; 0 breakpoint locations disabled.
(lldb) br li
No breakpoints currently set.

breakpoint set 创建断点

(lldb) breakpoint set -f main.m -l 16
Breakpoint 1: where = DebuggerDance`main + 27 at main.m:16, address = 0x000000010a3f6cab

也可以使用缩写形式 br。虽然 b 是一个完全不同的命令 (_regexp-break 的缩写),但恰好也可以实现和上面同样的效果。

(lldb) b main.m:17
Breakpoint 2: where = DebuggerDance`main + 52 at main.m:17, address = 0x000000010a3f6cc4
创建一个在函数开始处的断点:

C语言函数:

(lldb) b isEven
Breakpoint 3: where = DebuggerDance`isEven + 16 at main.m:4, address = 0x000000010a3f6d00
(lldb) br s -F isEven
Breakpoint 4: where = DebuggerDance`isEven + 16 at main.m:4, address = 0x000000010a3f6d00

OC函数:

(lldb) breakpoint set -F "-[NSArray objectAtIndex:]"
Breakpoint 5: where = CoreFoundation`-[NSArray objectAtIndex:], address = 0x000000010ac7a950
(lldb) b -[NSArray objectAtIndex:]
Breakpoint 6: where = CoreFoundation`-[NSArray objectAtIndex:], address = 0x000000010ac7a950
(lldb) breakpoint set -F "+[NSSet setWithObject:]"
Breakpoint 7: where = CoreFoundation`+[NSSet setWithObject:], address = 0x000000010abd3820
(lldb) b +[NSSet setWithObject:]
Breakpoint 8: where = CoreFoundation`+[NSSet setWithObject:], address = 0x000000010abd3820

条件断点(Action)

例子:
打印 i,然后大声念出那个句子,接着打印了自定义的表达式,
下面是在 LLDB 而不是 XcodeUI 中做这些的时候,看起来的样子:

(lldb) breakpoint set -F isEven
Breakpoint 1: where = DebuggerDance`isEven + 16 at main.m:4, address = 0x00000001083b5d00
(lldb) breakpoint modify -c 'i == 99' 1
(lldb) breakpoint command add 1
Enter your debugger command(s). Type 'DONE' to end.
> p i
> DONE
(lldb) br li 1
1: name = 'isEven', locations = 1, resolved = 1, hit count = 0
Breakpoint commands:
p i

Condition: i == 99

1.1: where = DebuggerDance`isEven + 16 at main.m:4, address = 0x00000001083b5d00, resolved, hit count = 0

LLDB项目实用技巧

运行中更新UI属性

  1. 打印视图层级:

    (lldb) po [[[UIApplication sharedApplication] keyWindow] recursiveDescription]
    <UIWindow: 0x7f82b1fa8140; frame = (0 0; 320 568); gestureRecognizers = <NSArray: 0x7f82b1fa92d0>; layer = <UIWindowLayer: 0x7f82b1fa8400>>
    | <UIView: 0x7f82b1d01fd0; frame = (0 0; 320 568); autoresize = W+H; layer = <CALayer: 0x7f82b1e2e0a0>>
  2. 有了上面的输出,我们可以获取这个 view:

    (lldb) e id $myView = (id)0x7f82b1d01fd0
  3. 然后在调试器中改变它的背景色:

    (lldb) e (void)[$myView setBackgroundColor:[UIColor blueColor]]
  4. 更新到渲染服务中:

    (lldb) e (void)[CATransaction flush] // caflush

    Push 一个 View Controller

  5. 获取rootVC:

    (lldb) e id $nvc = [[[UIApplication sharedApplication] keyWindow] rootViewController]
  6. 然后 push 一个 child view controller:

    (lldb) e id $vc = [UIViewController new]
    (lldb) e (void)[[$vc view] setBackgroundColor:[UIColor yellowColor]]
    (lldb) e (void)[$vc setTitle:@"Yay!"]
    (lldb) e (void)[$nvc pushViewContoller:$vc animated:YES]
  7. 最后最新下面命令:

(lldb) caflush // e (void)[CATransaction flush]

查看按钮的 target

(lldb) po [$myButton allTargets]
{(
<MagicEventListener: 0x7fb58bd2e240>
)}
(lldb) po [$myButton actionsForTarget:(id)0x7fb58bd2e240 forControlEvent:0]
<__NSArrayM 0x7fb58bd2aa40>(
_handleTap:
)

整理自:https://objccn.io/issue-19-2/

扩展阅读:(Chisel-LLDB命令插件,让调试更Easy)
https://blog.cnbluebox.com/blog/2015/03/05/chisel/